Fall is a beautiful time of year to host a soiree, with its crisp air and colorful leaves. And what a better way to enjoy the fall foliage than with a delicious meal outdoors?
Decorate your table with fall-inspired elements and colors. For florals, we used faux autumn leaves placed inside a basket, they add height and interest to the table décor. We love to use dried limelight hydrangea this time of the year. It’s a beautiful and versatile flower that can be used in a variety of ways; it has a unique texture and muted colors. The brown wicked glass vase matched the other fall elements on the table.
For the linens we picked out a tablecloth with a rustic and natural look. For the napkins, we went with a neutral color finished with a bold border. The tablecloth and napkins are perfectly coordinated and complement the other elements of the fall table décor. The overall effect is a warm and inviting table setting that is perfect for a fall gathering.
Summer is in full swing, and there’s no better way to enjoy the warm weather than with a delicious and refreshing salad. This tomato, burrata, and peach salad is the perfect combination of sweet, salty, and creamy. The burrata cheese is the star of the show, and the peaches and tomatoes add a touch of sweetness. Burrata is a fresh Italian cow’s milk cheese that is made from mozzarella and cream. It has a soft, creamy texture and a mild, milky flavor. Peaches are a symbol of summer in many cultures. Did you know that in China, peaches are a symbol of longevity and immortality!?
Ingredients:
2 balls of burrata cheese
2 peaches, sliced
2 cups sliced cherry tomatoes, sliced
olive oil
salt
black pepper
Fresh basil leaves, for garnish
Arrange the peaches, tomatoes, and burrata cheese vertically on the serving platter.
Drizzle the olive oil over the salad and garnish with fresh basil leaves.
Tips:
Use ripe peaches for the best flavor.
If you don’t have burrata cheese, you can substitute mozzarella or goat cheese.
This tomato, burrata, and peach salad is a delicious and refreshing way to enjoy the summertime. It’s easy to make and can be customized to your liking. So next time you’re looking for a light and flavorful salad, give this one a try!
Here are some additional ideas for customizing this salad:
Add some grilled chicken or shrimp for a heartier meal.
Use different types of tomatoes, such as heirloom tomatoes or cherry tomatoes.
Add some other fresh herbs, such as mint, or oregano.
Drizzle the salad with a different type of dressing, such as a honey-balsamic dressing or a vinaigrette dressing.
Use grilled peaches
I hope you enjoy this delicious and refreshing salad!
Blue and white is a classic color combination that has been popular for centuries. It is often associated with the sea, sky, and purity, and it can create a sense of elegance and sophistication. Blue and white table decor can be used to create a variety of different looks, from formal to casual.
Start with a blue and white tablecloth. This will provide a classic backdrop for the rest of your tablescape.
Add blue patterned napkins. Don’t be afraid to mix patterns. When done correctly, mixing patterns can create a stylish look. However, it’s important to choose patterns that complement each other.
We used rattan round placemats and bamboo napkins rings; using various textures will help create visual interest and make your tablescape more dynamic. The plates are melamine. White melamine plates are a versatile and durable option for summer tablescapes. They are easy to clean and care for, making them perfect for outdoor dining. They are also lightweight and stackable, making them easy to transport and store. Acrylic glasses are a versatile and durable option for drinkware. They are made from a clear, lightweight, shatter-resistant plastic, perfect for outdoor events. We are absolutely in love with the design of this one .
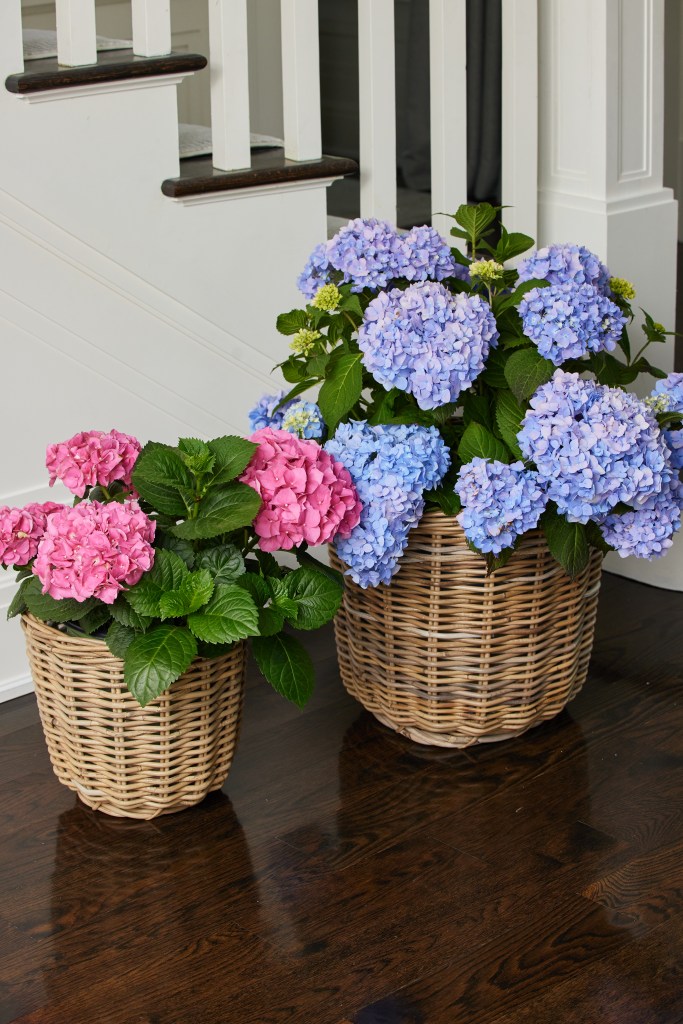
Hydrangeas are a quintessential summer flower, and you can’t go wrong adding them as your centerpiece. They are beautiful and versatile flowers that can be used in various ways. Hydrangeas in baskets are a beautiful and elegant way to add a touch of nature to your table. Baskets can create a unique and eye-catching centerpiece.
A white and blue tablescape can be quite simple, but it’s important to keep the overall look simple. Too many elements can be overwhelming and detract from the beauty of the colors. No matter what your style, there is a white and blue summer tablescape that is perfect for you. With a little creativity, you can create a tablescape that is both beautiful and inviting.
We love hydrangeas; they are one of our favorite flowers. It was one of our grandma’s favorite too; maybe that’s why we like them so much. It reminds us of her!! They are so simple yet have a significant presence with their large flowerhead. They always stand out, whether it is an all hydrangea arrangement or mixed with different flowers.
If you want to learn how to arrange flowers, hydrangea is a great place to start. They are easily accessible at most grocery stores and one of the easiest and least expensive arrangements to create.
Hydrangeas take a lot of water and can wilt quickly if not properly cared for. As soon as you bring them home, cut each stem at a 45-degree angle and put them immediately in water; this will allow the blooms to drink more water. When purchasing from your local store, often they come with flower food; make sure to use it.
If you are picking from your garden, after cutting them, boil water and dip each hydrangea stem into it for thirty seconds and then place it in a vase with room temperature water.
Hydrangeas drink water from their bloom heads as well, and spraying water on them helps prevent them from wilting. In case they do wilt, you can dunk its whole head in room temperature water.
Keep your hydrangea arrangement at a cooler temperature and away from drafts or direct sunlight. Replace the water every other day. With proper care, your hydrangea arrangement can last for weeks.
Potted hydrangeas look so beautiful and will last much longer than cut ones, especially if you pick one with few blooms and lots of buds.
Water the plant often, feel the soil, and if the top layer feels dry to the touch, it’s time to water it. Drainage is essential; make sure there are drainage holes at the bottom of the container you selected. Place your potted hydrangea where it receives bright light but not direct sunlight.
This appetizer is effortless to make and is such a crowd-pleaser. It’s a classic that everybody loves, perfect for any occasion! I bought the blinis at my local grocery store to make it even easier. However, you can make them at home.
The DILL CRÈME FRAICHE you can make the day before and store in the refrigerator. Recipe below.
Assemble: Spread the dill crème fraîche on a blini. Coil on a piece of salmon, top with chives or dill.
Calling all Nutella lovers!! We are absolutely obsessed with Nutella, and we love anything with it. This vanilla, strawberries and Nutella buttercream cake is soooo good and beautiful. It’s perfect for Mother’s Day!
–Vanilla box cake: choose your favorite box cake, and prepare the batter according to the instructions. Split the batter into two round 8″ cake pans, and follow the instructions to bake them.
–Strawberries: put them in a strainer and rinse with cold water. Remove the green stems and slice them in half (vertically).
–Nutella buttercream recipe: the original recipe is from Sugar & Sparrow.
Cream the butter on medium-high until it’s creamy and light in color, about 5 minutes.
Add the powdered sugar a few cups at a time, scraping down after each addition and making sure each cup is fully incorporated before adding the next one.
Add the Nutella and beat on med-high for a full minute.
Turn the mixer to low and add the vanilla, milk, and salt.
Mix for another 1-2 minutes, scraping down the bowl and paddle as needed, until smooth and fully incorporated
Calling all Lime lovers. This semi-homemade cake is easy and quick to put together. It’s light and packed with fresh flavors—the perfect ending to a summer dinner.
Start by baking two boxes of lemon supreme cake mix accordingly to the box baking instructions. We divide the batter in 4 round cake pans (about 9”). Allow cakes to cool completely in the pan. The cakes must be completely cool before frosting and assembling.
Now, it’s time to make the frosting!! In a large bowl, using a mixer fitted with a whisk attachment beat the whipping cream on medium speed until it begins to thicken. Keep mixing, add the condensed milk and the confectioner sugar. Increase to high speed, and beat until the cream is very stiff, and stands in firm peaks on the beater when it is lifted from the bowl.
Stop mixing and slowly add the lime juice and using a French whisk mix all together. Your lime Chantilly will be ready!
Let’s assemble the cake! Turn the cakes down and using a large serrated knife, slice a thin layer off the tops to create a flat surface. Place the 1st cake layer on your cake stand. Spread about 1 and 1/2 cups of frosting evenly on top. Top with the 2nd cake layer, and evenly cover the top with another 1 and 1/2 cups of frosting. Do the same with the 3rd and 4th layer.
After the last one, spread the remaining frosting on top and around the sides using an icing spatula. Use a bench scraper to smooth out the frosting on the sides of the cake. Decorate the cake with lime and mint.
Bake the 2 boxes of lemon cake mix accordingly to the box baking instructions. We divide the batter in 4 round cake pans (about 9”);
Allow cakes to cool completely in the pan. The cakes must be completely cool before frosting and assembling.
Frosting
In a large bowl, using a mixer fitted with a whisk attachment beat the whipping cream on medium speed until it begins to thicken. Keep mixing, add the condensed milk and the confectioner sugar. Increase to high speed, and beat until the cream is very stiff, and stands in firm peaks on the beater when it is lifted from the bowl.
Stop mixing and slowly add the lime juice and using a French whisk mix all together. Your lime Chantilly will be ready!
Assemble
Turn the cakes down and using a large serrated knife, slice a thin layer off the tops to create a flat surface.
Place the 1st cake layer on your cake stand. Spread about 1 and 1/2 cups of frosting evenly on top. Top with the 2nd cake layer, and evenly cover the top with another 1 and 1/2 cups of frosting. Do the same with the 3rd and 4th layer.
After the last one, spread the remaining frosting on top and around the sides using an icing spatula. Use a bench scraper to smooth out the frosting on the sides of the cake.
It is no secret that we love fresh flowers at home. They quickly brighten up any space and makes it more inviting. If you are new to flower arranging, the idea of creating your own bouquet can be a little overwhelming. But don’t get discouraged!! With the right tools, flower arranging can be fun and simple.
If this Spring, you feel inspired to start creating your floral arrangements, make sure that you have some basic tools on hand. And don’t forget: The first step to mastering a skill lies in the dedication and practice you put into that new hobby.
There are a lot of florist’s tools right there. But to make it simple, we have listed some of the basic tools that we use in our arrangements:
Floral clippers
A good pair of floral clippers is key to creating a flower arrangement and ensuring that each stem is cut correctly to allow the flowers to drink water.
Pruners
Thicker stems and branches can be a problem without the right tool. The branch cutters are similar to floral clippers but can easily cut and clip more rigid stems.
Floral Tape
Floral tape is a must-have! They come in different colors and can be used for wrapping stems and lining vases. We use the clear tapes more often than the green ones, but both work great.
The clear floral tape is helpful to create a grid on top of the containers to help flowers stay in place and add support. We replaced the floral foams with clear tape and the chicken wire, and we don’t regret it! The green waterproof tape can be used to secure the bases of stems together.
Chicken wire
They are also called ‘wire mesh’ or ‘wire netting’. Like the floral tapes, the chicken wire adds support to the arrangement and gives you control over the structure of the arrangement. They can be bent to help guide and hold your arrangements in large containers.
Flower Thorn Strippers
This tool is easy to remove thorns and leaves from the stems, especially from roses. Begin by pulling down gently down the stem of a rose. It is important, to begin with, enough space down from the rose head to prevent it from falling off.
Moss
Add green or Spanish moss for a more finished look at your potted arrangements, terrariums, and baskets. Don’t use the moss in a vase of water with flowers; use it in an arrangement that doesn’t sit in vessels of water. If using the green sheet moss, make sure to saturate it before using it.
Spray bottle
After we complete an arrangement, we finish it with a light mist of water to hydrate the blooms, especially the hydrangeas.
Optional: If you have a lazy Susan, prop your vase on it to easily move around your vase and check all sides.
Shop our tools
Note: As an Amazon Associate, we earn from qualifying purchases.
Easter is a time to celebrate the resurrection of Jesus, so it’s important to gather with our family and friends. We love creating a special tablescape for this holiday! Follow along to learn how we put together this one.
This tablescape is simple and easy to replicate. You don’t need something over the top to create a festive decor. Here, we accessorized the table with bunnies and medium-sized decorative easter eggs. They can be found almost at any store during this time of the year. Check the bottom of this post to shop. Since we used so many easter accessories, we kept the flowers simple. Remember, less is more!!
For the flowers, we used a spring classic, Hyacinth!! They are an early spring blooming bulb and are widely available in stores during this time of the year. They are incredibly fragrant with a sweet scent.
The pastel gingham pink linen napkins complemented the hyacinths and the flower vase’s pink shades. We love this pattern for Easter. We made the place cards a little more special with a spring feel by adding yellow spray roses. They are miniature standard roses easily found at stores. Using a hole puncher, punch a hole in the top of the place card.
Who doesn’t love chocolate!? We placed a few Lindt Chocolates on each place setting. After all, Easter is not complete without chocolate.
Looking for a last-minute dessert for your Valentine’s Day gathering!? Or just a cute and yummy one to make it to your kids!? Look no further; it doesn’t get easier than this one. Brownie paired with chocolate ganache, it’s decadent, delicious, and a super-easy dessert. After all, Valentine’s day is not complete without chocolate!! Top it off with strawberries and serve on an adorable heart bowl. Voile, you got yourself a Valentine-inspired dessert.
I used Ghiradelli’s Double Chocolate Brownie mix, but feel to use your favorite brand. There is nothing like a warm brownie fresh out of the oven. However, you can even skip this step and use store-bought brownies.
Homemade chocolate ganache it’s super easy and quick, requiring only two ingredients. It’s also incredible versatile with endless uses. You will need semi-sweet chocolate bars and heavy whipping cream for this recipe. Make sure to use high-quality chocolate bars and avoid chocolate chips as they will not melt into a good consistency. It’s important to note that if you let the ganache cool, it’s not pourable anymore but spreadable; therefore, don’t let it cool too much for this recipe.
In a heart-shaped bowl, place pieces of the brownies on the bottom, pour the chocolate ganache (recipe below), top it off with strawberries and garnish with mint.
Do you celebrate Valentine’s Day? If you plan to set the table for the occasion, here is a simple but adorable inspiration for V-day. I’ve linked most of the things I have used on this table and similar ones. Check the end of the post for info.
When I went into Citarella, these hot pink flowers spoke to me, and I couldn’t get my eyes off them. I was in love with this shade of pink, and I knew they were the ones. I then decided to go with the blue-pink color combination for my valentine’s day tablescape.
I used a blue patterned tablecloth from Julia Amory; she has a beautiful selection of table linens. When using an impactful tablecloth, I keep all other elements clean and simple; there is no need for too many flowers or decor. A patterned tablecloth can be very impactful and transform any table decor.
For the plates, I selected Juliska’s Berry & Thread French Panel Collection dinner and salad plates. I love this design and the off-white color; they are versatile and can be used on many occasions.
I picked napkins that were clean and simple, these blush linen ones from Pottery Barn coordinated nicely with the blue patterned tablecloth. Candles!! They make any setting cozier and more intimate. I love them! These candlesticks are from Crate and Barrel and are always a show stopper. Small blue bud vases as a final touch decor. Valentine’s Day is not complete without chocolate!! I added Godiva heart-shaped dark chocolate to every setting. A little something sweet to make V-Day more special.
Valentine’s Day is coming up in a few weeks! Whether you are celebrating with your significant other, kids, family, girlfriends, or by yourself, here is a cheese board inspiration. Perfect for a gathering or a night in!!
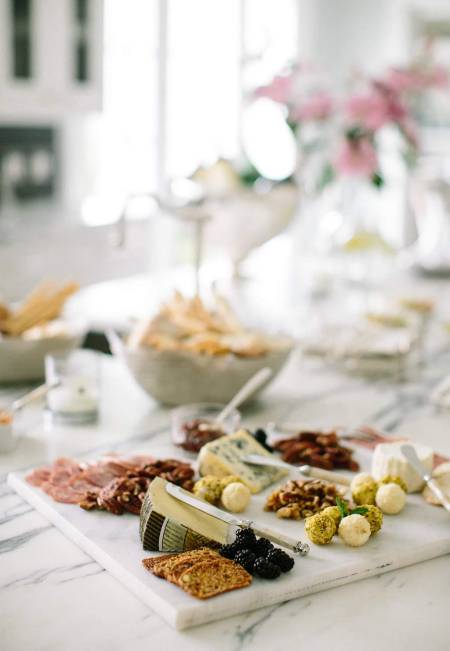
Start with the board! We love a white cheeseboard for the occasion; they look more feminine and make the strawberries and macarons pop. This one is a pottery charcuterie platter from Dresden & Company and is about 14″ wide. You can find a similar one here and more on the bottom of the page under “Shop The Post.”
Next comes the cheeses!! For this board, we selected Manchego, Brie, St. Agur Blue Cheese, and heart-shaped Swiss Cheese (this one was mainly for decoration purposes). However, feel free to choose your and your guests’ favorites -the sky is the limit!! For most people, due to the wide variety, selecting cheese can be a little overwhelming. We sliced the manchego to give more dimension to the board and kept the brie and blue cheese in their original form. For the heart-shaped swiss, use a mini cookie cutter (1.5″) to cut through it (we used the regular sliced swiss cheese).
Crackers!! We love the original crisps from 34 Crisps. They are so thin yet so crunchy and pair so well with so many different types of cheese. Plus, as a bonus, they are lower in calories than most crackers. The other must-have crackers that we always have on our boards are the Lesley Stowe ones. They are so savory and look beautiful! They have a variety of flavors, and they are all so delicious. Both brands you can find at most grocery stores.
Condiment! We kept this board simple and only added honey. Is there anything better than a small bite of brie on a cracker and topped with honey? It’s so simple but so tasty! One of my favorite combinations.
Fruits! Strawberries are the most “Valentiney” fruit; don’t you agree!? We couldn’t leave them out. They pair so well with the brie and honey.
Nuts! We are absolutely obsessed with truffled almond nuts. They are divine and one of those foods that you can’t stop eating. We also love how their color complements the board’s color scheme.
Sweets! After all, it is a savory and sweet board, and it is a valentine-inspired cheeseboard. To me, macaroons are a good idea, anytime, anywhere, and at any season. They are one of my favorite desserts. I also love their shape and the different colors available. Valentines is not complete without chocolate!! These Godiva heart-shaped ones are the perfect addition to the board.
Lastly, garnish with rosemary for a little pop of green!! So easy and super quick to put together! Happy Valentine’s Day! Lots of love!!!
You and your friends deserve a few hours of fun, right?? This February 13th, make your closest friends feel special by throwing a Galentine’s Day party!!! This informal soiree should be casual and stress-free. The trick is to prepare everything beforehand and keep it low-key. The point is to have fun and relax!!!!
1- Decor and set-up:
Don’t stress over every detail! There is no need to re-create a florist flower arrangement; just get a few flower stems at the grocery store and put them in a vase. This will be enough décor for your get-together.
Parties always end in the kitchen, right? So, let’s start there too!! Set-up the food and drinks on your kitchen island. Don’t have one? A kitchen table can fill in as an alternative, or you can bring the party to your living room and set the food up on the coffee table.
2- Food:
Don’t make things complicated! This event is more about socializing than trying to show all your cooking skills (we are sure you have lots….but save it for another gathering). Take advantage of the great selection of cheese, meat, nuts, and dips at grocery stores and create a charcuterie board. Better to focus on finger food that doesn’t require utensils.
If you still feel like creating something that looks fancier but requires just a few steps, you can try our Goat Cheese Balls, and why not a Mediterranean Quinoa Salad. They take a minute (ok…maybe a few minutes) to make, and your friends will love it.
For the sweet eaters, you can buy a pre-made dessert or make some of our favorite desserts:
They are all very easy to prepare and require zero cooking skills!!!!
3- Drink
Water, white wine, red wine, and champagne should be enough! Leave it on a big bucket full of ice so the guests will feel comfortable helping themselves. But if you want to go a little bit over, have vodka, rum tequila, and a couple of fruits and let the girls create their own drinks.
4- Vibe
This event should be a release of all the stress from your busy lives. Have some music playing in the background for an ambiance. In the end, this get-together is meant not only for your guests to relax and have fun, but you also deserve it.
This Mediterranean quinoa salad makes for a quick lunch or dinner, and it can be served as a side dish or enjoyed as a meal on its own. This salad also keeps well if you make it ahead of time, so it’s a great recipe for when you are entertaining, so you can prepare ahead of time
What’s in this salad?
Quinoa – The protein-packed quinoa brings a nice texture and is the “heart” of this salad.
Turmeric and curry – These two spices are easily accessible, packed with tons of flavor, and full of health benefits.
Feta cheese – The feta’s creamy texture and salty taste will bring this salad to a whole new level.
Black olives – You can skip it if you are not big on olives. We love it, so we always add it to this salad.
Mint – In our opinion, mint is a MUST in this salad.
Tomatoes and cucumbers – they will give a nice texture and crunch to the salad
Olive oil, salt, and pepper
Some tips:
Cook the quinoa ahead of time and let it cool completely before tossing the salad together.
Adding the turmeric and curry to the water before you cook the quinoa will give that yellow tone to the dish.
We prefer adding olive oil, salt, and pepper as the dressing, as the turmeric and quinoa will already give lots of flavor to this salad. If you prefer using a more elaborate sauce, you can use an Italian dressing.
Try this recipe and let us know what you think!!
Mediterranean Quinoa Salad
This Mediterranean quinoa salad makes for a quick lunch or dinner, and it can be served as a side dish or enjoyed as a meal on its own.
Have you ever tried or heard about alfajores? If you have never tried them, you are missing out! They are delicate dulce de leche sandwich cookies that are very popular in South America. They are incredibly delicious, rich, and melt in your mouth.
As we like effortless recipes, we have twisted this classic cookie and created the liquid alfajor. It combines the dulce de leche and shortbread cookie and doesn’t require any baking.
Dulce de leche is decadent, smooth, and rich! If you are not familiar with this confection, they can be bought in cans and are most commonly found in your local store’s baking aisle. All the other items, we bet you are very familiar with.
Ingredients: – 11 oz dulce de leche – 11 oz heavy cream – 6 oz butter cookie or shortbread cookie – 8oz bittersweet chocolate – grated – Mint leaves to garnish
How to:
Combine the dulce de leche and heavy cream and bring to a simmer for 3 min. Let it cool and pour the cream into a glass or a bowl;
Crush the cookies into fine crumbs;
Add the cookies crumbs on top of the cream;
Add the grated chocolate and refrigerate;
Décor with mint leaves.
You won’t regret trying this recipe. It is simply divine, quick, and a good choice to serve as a dessert. Irresistible!
Liquid Alfajor
Liquid Alfajor is a dessert that combines dulce de leche, chocolate, and shortbread cookies. It's so decadent, smooth, and rich
These goat cheese balls taste decadent and are so simple to make!!! They are a great last-minute appetizer and a flavorful addition to any party spread.
This recipe calls for dates or grapes. Both are great, but we personally prefer the ones with dates. The natural sweetness of the dates paired with the tart flavor of goat cheese is so tasty.
Here is what you need:
Goat cheese
Dates or grapes
Crushed pistachios or almonds
How-to: – Cut the dates in half; – Wrap the dates with goat cheese and make small balls; – Cover the balls with crushed pistachio or almonds;
Flower Arranging can be a little overwhelming for most people, especially if you mix different types of flowers and colors. This one is though super simple and easy to follow. We used small white ivory hydrangeas, ivory roses, and green hypericum berries, all of which can be found year-round.
The first step is to fill the vases with room temperature water; add warm water if the flower buds are tight and you want to help them open up faster. Don’t forget to add flower food to your vase water (they usually come with the flowers when you purchase them at grocery stores)! It will help slow down bacterial growth.
When trimming the stems, make sure to do it at an angle. Doing this ensures that the flowers will absorb plenty of water and nutrients. Remove all the leaves from the stems, make sure there are no leaves below the waterline. Start with the roses, slowly and gently, remove the guard petals that are wilted and/or have black edges.
Next, if you want the blooms to open up, gently blow onto them. Place three roses in the vase.
Next comes the green berries; place one on each side of the roses (don’t forget to remove all the leaves from the stem). Hypericum Berries make great fillers to any arrangement, and they also give texture and volume. The following step is to add the hydrangeas to each side of the berries. Keep repeating this pattern until you have filled your entire vase. Refer to the video below. Happy Arranging!
Creating a stylish table setting for family and friends is probably one of our favorite things to do during the holiday season. Whether you are hosting a holiday dinner or hosting just you and your immediate family, don’t overlook your dinner table. A beautiful table setting will set the ambiance of the evening.
The elegant mix of orange, green, and deep purple was our color choice. It’s a beautiful color palette that adds sophistication to the décor. We selected cream and green dinnerware for an extra charm to the table. If you don’t have dinnerware with green accents, don’t worry! This table would have looked as beautiful if we had used white plain plates.
To enhance the appearance of your Holiday table, don’t forget the candles! While white or ivory taper candles are always a classic choice, we also love to add colorful candles on the table for an easy way to add a pop of color. We chose the warm amber taper candles for this setting to bring a glow and coziness to the table.
One tip is to consider using unscented or lightly scented candles when adding them to your table. The objective here is to create ambiance and not fragrance. You don’t want the candles to overpower the aroma from the meal.
The centerpiece is filled with roses, waxflowers, safari sunset, hypericum, alstroemeria, poms, and mini calla-lilies. If you don’t master a flower arrangement, you can simply combine alstroemerias and roses or even select just one flower. All you have to do is cut all the stems at the same height and add to a glass container. A brass bowl of clementines would also be a great option in this setting. Do what works for you and with what you have at home!
The clementines and the calla lilies brought a pop of color to each set!
The most important tip to create your table décor is to remember that the table set doesn’t have to be over the top to make a statement. Set the table with care, and your family and friends will certainly feel the love! Happy Holidays!
This Thanksgiving set a simple, yet a warm and cozy table that celebrates great food and amazing company!
From simple styling to more elaborate looks, there’s always a way to make your table feel festive. No matter the style you choose, setting the table for Thanksgiving should be pleasant and not be difficult to achieve.
This table layer rustic elements for a look that’s cozy and inviting. Glints of copper paired with the wicker placemats created the scene. Here are some elements we added to create this rustic and elegant style:
Wicker chargers: rich in texture, the wicker charger adds a welcoming and rustic feel.
Traditional turkey motifs dinnerware: To add some festive feelings to the table, we added a traditional turkey motif dinnerware. These gorgeous plates certainly set a warm atmosphere for a traditional dinner.
Lanterns: lanterns centerpiece can add charm and elegance to any space. Choose small lanterns that are not too big to make it difficult for guests to talk across the table. If you want to add larger lanterns, make sure to place them on the side of the table, like we did here. In decorating, the rule of 3 is the golden rule, so to create a balance, we paired three lanterns on each side
Pumpkins: Complete the look with autumnal elements. The pumpkins with succulents on the side bring natural beauty to the table without crowding the setting.
Napkins and Place card: The napkins serve double-duty as elegant placeholders. We ditched the napkin rings for a more personal and creative way to dress up the napkin. We inserted greenery with a tied place card into a pocket folded napkin.
The food: Thanksgiving is one of those holidays that revolves around food, so we reserved the center of the table for the “Hero of the night!”. A large wood board decorated with roasted garlic, oranges, persimmons, dried apricot holds Turkey. You can find here for more details on how to decorate your turkey platter. The sides were served on the lovely mini copper pans.
If you like this setting, you can use this table décor as a jumping off point for you to create a table that’s uniquely YOURS. Happy Holidays!
We have selected some of the best Black Friday deals at Macy’s. We will update this page as we see more exciting items. Most of these items we own!
This post contains affiliated links which means that we may receive a small commission, if you buy through the link. This does not result in additional charges for you, but it helps us a lot to keep our business up and running.
We won’t attempt to give the Perfect turkey recipe, as we have no shame to admit that most of the time we order our Turkey for the Holiday festivities. However, we encourage you to make your main dish look good on the server platter!
Check below these two pictures and tell us if it is worth it or not!
The first step is choosing the right serving platter. For a rustic look, feel no fear to serve on a wood large board (as we did here). For a more elegant and traditional look, a white or pattern large platter will be beautiful.
For the garnishes, we chose items that are not only delicious but also colorful. We chose roasted garlic, sliced persimmons, dried apricots, sage leaves, and dried oranges. Other options are roasted mini potatoes, cranberries, sliced apples, and pears.
There is really no secret! All you have to do is roast the heads of garlic and the oranges. For the garlic, make sure to trim the top off the head of the garlic just enough to expose the garlic cloves and roast them for about 30 minutes. You will need to bake the oranges for a little longer, but make sure not to let them burn.
As your Turkey is roasting, you can already arrange the items on the corners of the serving platter. When the turkey is ready, all you have to do is place it right in the middle and bring it to the table!
We have also selected below some beautiful large platters that would look beautiful on your table. Happy Holidays!
Who doesn’t love a creamy burrata?! Add pears, prosciutto, arugula, and toasts topped with the sweet fig preserve, and you will have a great platter that can be served as a salad or even as an appetizer.
This is a great fall recipe and so easy and delicious. As you know, we don’t like to spend hours in the kitchen, so we love simple and delicious recipes. This one combines the creamy burrata cheese with the salty prosciutto and the sweet fig jam and is so amazing!!!
Start by making the champagne vinaigrette. You have probably already seen this recipe a few times in our blog. It’s a simple dressing and so good! All you need is champagne vinegar, olive oil and
In a small bowl, add all the ingredients for the champagne vinaigrette and whisk together until smooth and well combined.
For the salad, you will need: Baby arugula, sliced pears, prosciutto, burrata cheese, fig jam, and balsamic glaze.
In a larger bowl, toss the arugula with the dressing until well mixed. Place the arugula on the platter you will be serving. Add the burrata in the middle, the sliced pears, and the prosciutto. Top the toasts with fig jam and add to the sides of the salad. Finish up with a drizzle of balsamic glaze and salt and pepper.
Watch the video, and you will be surprised how easy it is!
Pear and Creamy Burrata
Who doesn’t love a creamy burrata?! Add pears, prosciutto,arugula, and toasts topped with the sweet fig preserve, and you will have agreat platter that can be served as a salad or even as an appetizer.
In a small bowl, add all the ingredients for the champagne vinaigrette and whisk together until smooth and well combined.
In a larger bowl, toss the arugula with the dressing until well mixed. Place the arugula on the platter you will be serving.
Add the burrata in the middle, the sliced pears, and the prosciutto. Top the toasts with fig jam and add to the sides of the salad. Finish up with a drizzle of balsamic glaze and salt and pepper.
This is a great fall salad that you can serve as lunch or as a side dish. This salad comes together in less than 10 minutes and looks beautiful! It is loaded with the best fresh fall products: apples, pears, and arugula. It is the perfect combo of sweet and savory!!
The list of ingredients is very short! For the salad, you will need: Apples, Pears, Arugula, Goat Cheese, and Candied Walnuts. For the dressing: champagne vinegar, olive oil, salt, and pepper.
Start by making the champagne vinaigrette. This has become one of our favorite salad dressings, and we make this to drizzle on most salads.
In a small bowl, add all the ingredients for the champagne vinaigrette and whisk together until smooth and well combined. In a larger bowl, toss the arugula with the dressing until well mixed. Place the arugula on the platter you will be serving and add the crumbled goat cheese and candied walnuts on top.
Next, cut the apples and pears vertically. You want to choose a crunchy apple that isn’t going to brown too quickly when sliced. We have picked Gala, which is extra-sweet, crisp, and juicy, but Cortland is also a great option. When it comes to apples that don’t brown easily, the Cortland is one of the best.
The pears, like the apples, also turn brown quickly after they are sliced and exposed to air. So after you slice the apples and pears, we recommend soaking them in a bowl of cold water and fresh lemon juice for about 3 minutes.
Layer the sliced apples and pears on top of the arugula, and voila, super easy!!
Apple and Pear Fall Salad
Apple and Pear Fall Salad! This is a great fall salad thatyou can serve as lunch or as a side dish. This salad comes together in lessthan 10 minutes and looks beautiful! It is loaded with the best fresh fallproducts.
This Fall Sangria Recipe is delicious and refreshing! We called it Fall in a glass as it includes the most iconic autumn flavors: apples, pears, plums, apple cider, and cinnamon. Can you imagine how good it tastes???
This recipe is seasonal, simple, and the perfect addition to your Friendsgiving, Thanksgiving, or any other Fall gathering. You can make this recipe a few hours ahead or even the night ahead serving it. It is ideal to allow a few hours for the flavors to combine.
Here is what you need:
Fresh Apples
Fresh Pears
Fresh Plum
White Dry Wine (Pinot Grigio is our favorite for this recipe)
Apple cider
Cinnamon sticks
Sparkling water or Club Soda
Fresh thyme
How to Make
1- This fruity wine cocktail not only tastes amazing, but they are one of the easiest cocktails to prepare.
2- Start by chopping all the fruits in small chunks. You can also make a different fruit combination using this same recipe. Make sure to choose fruits that are in season and ripe, but firm, and you will not get it wrong!
3- Gather a large pitcher and add the fruits. Followed by the apple cider, cinnamon sticks, thyme, and last the wine. We prefer adding the sparling water only when it is time to serve the sangria.
4- Refrigerate for at least 2 hours. Don’t let it sit for more than 24 hours, or the fruits will start getting brown and the taste won’t be the same.
When it is time to serve, you can add the sparkling water and enjoy this easy and delicious cocktail!
This Fall Sangria Recipe is delicious and refreshing! We called it Fall in a glass as it includes the most iconic autumn flavors: apples, pears, plums, apple cider, and cinnamon. Can you imagine how good it tastes???
Prep Time 5 minutesminutes
2 hourshours
Servings 4
Ingredients
2apples cored and sliced
2pears cored and sliced
1 plum cored and sliced
1bottle of dry white wine
1/2cupapple cider
2cinnamon sticks
Sparkling water
Thyme
Instructions
1. Add the chopped fruits to a large pitcher, followed by the apple cider, cinnamon sticks, thyme, and wine. Stir well.2. Cover the pitcher bring it to the refrigerator to chill for 2 hours.3. When ready to serve, add a splash of sparkling water, and it is time to enjoy!
It’s no secret that Carolina and I LOVE Hydrangeas. Hydrangeas are elegant, and their large blooms not only serve as a base for flower arrangements, but they are also stunning on their own. Fresh-cut or dried, hydrangeas are always stunning!
Hydrangea is a popular bloom for dried arrangements. By drying their blooms, we can enjoy their beauty for months. There are a few methods to dry hydrangea flowers, but vase drying is easier and helps preserve their color. There is also a silica method that dries the hydrangea in only 4 days and maintains the original shade. I have never used this method as I have read a few reviews saying it is expensive and risky to damage some of the petals.
There is not much secret to dry the hydrangeas blooms. It only requires patience as the process may take two or more weeks to dry. Follow some of my tips:
The first step, and probably the most important, is to identify when to cut hydrangeas for drying. Fresh blooms tend to wilt before they dry, so allow them to remain on the bush past their prime. You should only cut the flowers after they have already changed the color (vintage look) and started to dry while on the bush. But be careful and make sure to cut the flowers before they turn brown. Septembers and early October is usually the best time to cut them to dry and preserve.
Cut the blooms 10-15” long. You can even go longer depending on what type of arrangement you want to create. I personally don’t like to prune my hydrangeas too short, so I cut no longer than 15”.
Strip off all the leaves and place the blooms in a bucket or in a vase with water (fill the vase ¾ with water). I like to enjoy my hydrangeas before they dry, so I arrange them as I would do with any other flower arrangement and place them throughout my house while they dry. Just make sure Strip off all the leaves and place the blooms in a bucket or in a vase with water (fill the vase ¾ with water). I like to enjoy my hydrangeas before they dry, so I arrange them as I would do with any other flower arrangement and place them throughout my house while they dry. Just make sure to place them out of direct sunlight; otherwise, they will fade very quickly.
Monitor the water level and the blooms. Allow the water to evaporate naturally as the flowers dry but depending on the look and feel of the blooms you may need to add more water. If the water has evaporated and the blooms are still supple, you can add more water to the vase. When the petals look like paper, then stop watering and let the water evaporate completely.
Once the hydrangeas are fully dried, you can spray them with hairspray to help keep the blooms together. I usually wait until I arrange them in a wreath or a basket, then spray them with the aerosol.
Now, you are ready to enjoy your dry hydrangeas for months, even years! They look lovely in wreaths, baskets, and Fall arrangements. Enjoy!!!
It’s apple season!! Have you gone apple picking yet!? It’s one of our favorite fruits to pick and a great family activity! We, like everyone else, always end up with so many apples. There are countless recipes you can make with them. However, if there is a single recipe that embodies the spirit of fall baking is a good apple crumble. Do you prefer yours with oats or without oats? We have always debated which one is our favorite, but we always end up without the oats. We find that the combination of cinnamon and sugar, held together by flour and butter, is just perfect.
Ingredients · 5 large gala apples, peeled or unpeeled, cored, and sliced 1/4-inch thick · Juice of half of a lemon · 1/2 cup of white sugar · 1/2 cup of brown sugar · ¾ cup of all-purpose flour · 2 tsp pf cinnamon · 6 tbsp of butter
In a medium bowl, whisk together both sugars, flour and cinnamon. Add the butter pieces and use your fingers to rub the mixture together until the butter is incorporated and the mixture resembles coarse crumbs. Cover with plastic wrap and place in the refrigerator to chill while you prepare the apple filling.
Place the sliced apples in a baking dish. Squeeze juice of half a lemon over the apple and toss it together. Sprinkle crumb topping over the apples. Bake at 350 degrees for 35 to 40 minutes, until topping is nicely browned and apples are done.
Transfer to a wire rack to cool for 10 minutes. Serve warm, with a scoop of vanilla ice cream (non-negotiable our my opinion)
5 large gala applespeeled or unpeeled, cored, and sliced 1/4-inch thick
Juice of half of a lemon
1/2 cup of white sugar
1/2 cup of brown sugar
¾ cup of all-purpose flour
2 tsp pf cinnamon
6 tbs of butter
Instructions
In a medium bowl, whisk together both sugars, flour and cinnamon. Add the butter pieces and use your fingers to rub the mixture together until the butter is incorporated and the mixture resembles coarse crumbs.
Cover with plastic wrap and place in the refrigerator to chill while you prepare the apple filling.
Place the sliced apples in a baking dish. Squeeze juice of half a lemon over the apple and toss it together.
Sprinkle crumb topping over the apples.
Bake at 350 degrees for 35 to 40 minutes, until topping is nicely browned and apples are done.
Transfer to a wire rack to cool for 10 minutes. Serve warm, with a scoop of vanilla ice cream
As we approach fall, do you get that itch for the new season but also want to hang on to summer just a little longer? Then, this transitional tablescape is perfect for you!
Let’s start with the flowers, our favorite element when setting the table. Annual sunflowers bloom from summer into autumn, and they are easily accessible. You can find them at floral shops and most grocery stores. We even saw a bunch of them at Target a few weeks ago. Sunflowers can brighten up any table decor and lift anyone’s spirits. They stand out in any setting with their long and strong stems and their large and bright leaves. Less is more when it comes to this type of bloom, by just adding a few of them to your table will add such an impact. They sure will cheer your decor and your guests.
They have such a strong presence, that we like to keep them solo and never mix them with other flowers. Their stems are so unique, long, and strong that they deserve to be visible. We don’t like to cut them too short, but also be aware of their height as you don’t want to block your guests’ line of sight and obstruct conversation. We used these Pottery Barn bud vases, which also help prevent obstruction. If you are using taller arrangements, narrow and clear vessels are best.
Now, let’s talk about the chargers; the Juliska rustic rope natural chargers add warmth and an autumn vibe to the decor. This hue of brown is perfect for the fall.
Go neutral with the plates. Since the sunflowers, chargers, and napkins have three different colors, it’s best to keep them simple. We love Juliska Berry & Thread dinner and salad plates; they go so well with nearly everything. A set of neutral plates like white and ivory solid pieces is timeless and versatile. You can dress them up or down with different napkins, placemats, and chargers. Keep it in mind when purchasing a set of dinnerware.
What we love the most about these Serena and Lily napkins is their neutral color. They are so versatile and can go with nearly any table decor. They are simple but yet add so much charm to the tablescape.
Finally, candles! These small CB2 tea light candle holder are subtle and informal but still adds that touch of warmth and intimacy to the ambiance.
Lemon mousse is so refreshing and always a great dessert! We made it extra special by serving it on ice cream cones and covering it with a delicious Italian meringue.
Lemon mousse is light and creamy and can be whipped up in a few minutes. There are so many different recipes for lemon mousse out there, but one of our favorites is this one with only 2-ingredients. It is full of taste, simple, and requires zero cooking skills. We also love that you can make it a day in advance, saving on prep time.
Meringues are so delicious, but a lot of people think they are hard to make. We must admit that we thought so until we started making this Italian meringue recipe. There is no secret! Italian meringue is made with a hot sugar syrup that is mixed into whipped egg whites. The hot sugar syrup partially cooks the egg whites making them safe to eat and gives the meringue a firm texture and flavor.
For a beautiful display, we served the lemon mousse in ice cream cones. The waffle cones are a perfect addition to a dessert table. They not only are cute but give a nice crunch texture to the lemon mousse.
To make this easy lemon mousse, you only need two ingredients: condensed milk and lemon juice! Combine these two ingredients, and you will be amazed by the taste and the texture. As soon as the acid from the lemon juice hits the condensed milk, the mixture thickens. After both ingredients are well-combined, bring the lemon mousse to the fridge for 2-hours to set.
Lemon mousse is ready; now it’s time to prepare the Italian meringue. In a small saucepan, combine sugar and water. Heat over high heat and let it cook until the sugar syrup reaches a temperature of 240F (I use a thermometer to check the temperature). Meanwhile, using a mixer on medium speed, mix the egg whites until soft peaks form, about 2 minutes. With the mixer running, carefully and slowly drizzle in the hot sugar syrup. Increase speed to high and whip until you get a stable glossy meringue. Allow it to cool completely before using it. You can cover it with clingfilm and leave it in the fridge for up to two days.
When it is time to serve, add the lemon mousse to the ice cream cones up to the top, cover it with the Italian meringue. We don’t recommend adding the lemon mousse to the waffle cones too early in advance. If you leave the lemon mousse too long in contact with the cone, the chances are that the cone will get soggy (I did that once, and it did not taste good).
For a toasty golden brown color, we toasted the meringue with a culinary torch. If you don’t have a torch, don’t worry! You can certainly skip this step!!
Lemon Mousse and Meringue Ice Cream Cones
Lemon mousse is so refreshing and always a great dessert! Wemade it extra special by serving it on ice cream cones and covering it with adelicious Italian meringue.
1. In a large bowl, mix the condensed milk and the lemon juice until well combined (about two minutes)2. Refrigerate, covered, for two hours or until completely chilled and thickened. It tastes even better if refrigerated overnight (don't forget to cover the mouse).3. Prepare the meringue: In a saucepan over medium heat, bring the sugar and water to a boil. Cook over high heat until the sugar syrup reaches a temperature of 240F degrees and remove from heat.4. Meanwhile, combine egg whites and salt in the bowl of a stand mixer fitted with the whisk attachment. Set the mixer to medium speed and mix until soft peaks form. Increase the whipping speed to high and pour in the syrup in a thin stream while whipping. Whip for about 10 min until you get a stable glossy meringue. Let it cool completely. You can leave it on the fridge covered until it is time to serve.5. When it is time to serve, add to the ice cream cones the lemon mouse and cover with the Italian meringue.6. Optional: Brown the meringue with a blowtorch.
There is nothing like a meal alfresco on a nice day with family or close friends. We put together this tablescape for a special lunch with our mom and sister. Yes, we have a younger sister who lives in NYC!!! Due to COVID, we hadn’t been together for 1.5 years, and oh boy, we missed spending time together. This table decor is so simple and casual but so inviting at the same time.
Let’s start with the color scheme, we picked the traditional blue and white palette. You can never go wrong with this color combination. Next are the placemats, wicker and rattan ones are great options for outdoor entertaining. The light natural color of these charger plates was the perfect backdrop to the blue and white plates. These placemats are from Pottery Barn, we have them in two different colors. They are so versatile and go well with so many different styles of plates.
We used melamine plates and acrylic glasses; they are great for the summer when eating outside. These Q Squared Dinner Plates are so beautiful and have a Mediterrane fell to them. How stunning is this design!? The water goblets are also from Q Squared; we absolutely love their design, and they are also so durable! Unfortunately, they don’t carry this exact one anymore. The wine glasses are from William Sonoma. There are so many acrylic glasses available, and they came in a variety of styles, sizes, and colors. There are endless options for every taste.
Bamboo flatware is one of our favorites!!! We use them all the time in the spring and summer. They will never go out of style, making them an excellent investment. They add a fresh and casual look to any table decor. This bamboo flatware is from Pottery Barn and is very wallet-friendly compared to other brands.
Don’t be afraid to mix patterns and prints, as long as they complement each other. The plates and napkins’ different patterns and shades of blue look so lovely together.
Finally, the centerpiece!! Ditch the flowers for fruits! If flower arrangement is not your forte, or you want something different, fruits are a great alternative. How charming is this bowl of peaches!? They added a pop of color, and they are in season now, bringing that summer feel to the table decor.
You READ this RIGHT… SKINNY Margarita, YAY!! It’s no secret that we love margaritas. Margaritas are refreshing, and a great summer drink. However, most margarita mixes have lots of corn syrup, liqueur, and sugar. In our opinion, the best margaritas are the ones that combine a good quality tequila with fruit juice, lime, and sparkling water. That’s it!!!
Drink stations are fun and keep entertaining easy for both the hostess and the guests. They give your guests the freedom to select their drinks and get refills whenever they want. The idea of creating a Margarita bar is perfect for the summertime.
As you get started, the first step is to plan where you will set up your margarita station. We used a bar cart; however, any table, countertop, or buffet works. For the décor, you won’t need much! The fruits and juice are colorful and will already be the star of the station. Besides offering slices of fruits to garnish the drinks, we also created a small fruit arrangement to add an extra décor touch. A beautiful flower arrangement goes well in any place, so we could not avoid adding some flowers to our station. Check out how we styled this arrangement.
How to set a Skinny Margarita Bar:
When it comes to making the perfect margarita, a high-quality tequila offers the best flavor. The best tequila for margaritas includes reposado, blanco, and añejo tequila. Make sure to search for the ones that say 100% de agave. The brands labeled as “mixto” have been cut with an inferior natural cane spirit.
Serve an assortment of fresh fruit juice. Our favorite choices are lime, grapefruit, and watermelon. But don’t be afraid of being creative with the fruits. Pineapple, Strawberry, and raspberry are some other great choices.
Fresh fruit slices for garnishes. They will also serve as décor to the drink station.
Don’t forget the pepper! In our opinion, spicy margaritas are the best. Our favorite is serrano pepper, but if you can’t find it, jalapeno is also a great option.
Get plenty of ice!
Water is key! Sparkling water works the best.
Glasses or tumblers
Provide sweetener or agave in case guests prefer to sweeten their drinks.
Provide salt and sugar for coating the rims.
This is all you need at your margarita station. Your guests will love creating their own drinks and trying different flavors.
Optional: Slice the center of a lime wedge and rub the wedge around the rim of your glass. Pour a layer of salt onto a small plate. Dip the glass into the salt.
Add ice to your glass, tequila, lime juice, slices of serrano pepper, and sparkling water.
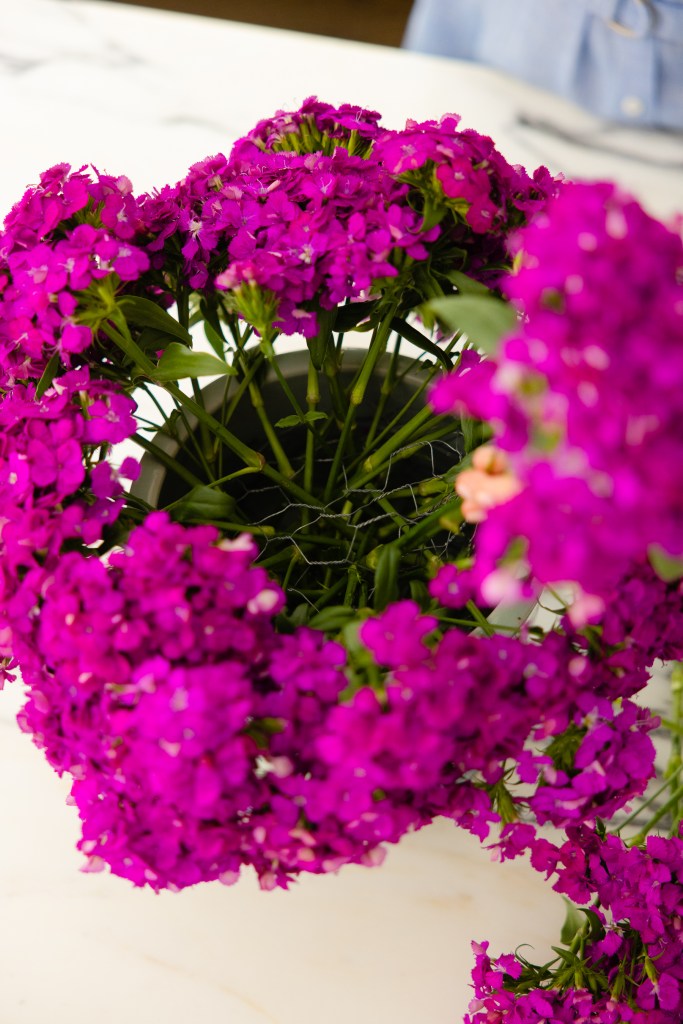
How stunning is this shade of Dianthus!? We love this flower because it has an extraordinarily long vase life. It’s a great one to add to your home decor. They come in many colors and textures, so there is one for every taste. You can easily find them in your grocery store. They are simple flowers, but they can stand out in a room when combined with a gorgeous vase. Follow the tips below to help you replicate this arrangement.
For an environmentally friendly option, choose chicken wire instead of floral foam. Another advantage is that the flowers can drink naturally, helping with their longevity. Don’t let chicken wire intimidate you; they are easier to use than you think.
First, start by selecting one with large holes as it will be much easier to place the flowers. Next, cut the chicken wire in a square shape (a piece larger than your container’s base). The following step is to fold it into a cushion shape, ensuring the sharp edges are twisted in and tucked inside the rim of the vase. The objective is to create a cover for the opening of your vessel.
When creating your flower arrangement, one important tip is proportion, including the height of flowers. Traditionally, for a well-balanced arrangement, the length of the flower stems should be one and a half to two times and a half the height of your vase. If you’re using a tall vessel, the entire arrangement should be two and a half times the height of the container. For smaller vases, like this arrangement, the final bouquet height should be one and a half times the size of the vase.
Fill your container with water and place the dianthus in the vase. This arrangement is incredibly easy to make!!!
Strawberries are one of our favorite fruits, and our kids too. We ALWAYS have them in our fridge. This bright, juicy, and sweet fruit is great for desserts; we will eat any treat with them! They are also a great source of fiber, vitamins, and minerals. So why not pair with another great source of fiber, dates!! They are natural sugars making them perfect for desserts. We created this super easy, delicious, healthyish, and adorable no-bake bite-size treat perfect for the summertime. This one is truly super simple!!
The first step is to wash the strawberries and gently pat them dry with a paper towel. Next is to pit the strawberries. Using the tip of a knife or a strawberry huller (so worth it! so much easier to use a huller), remove the center. Set them aside.
Now, it’s time for the dates. If not pitted, remove their pits. Then, thinly slice them, or cut them into small pieces. It’s time to assemble!! Fill the strawberries with the bits of dates, add a layer of whipping cream and top everything off with a slice of date and garnish with mint. Serve immediately.
If you want to make this dessert ahead of time, substitute the whipping cream for vanilla frosting or cream and leave it in the fridge until is time to serve. For the strawberries to stand up, slice the bottom of the fruit to create a level base! Super easy and done in a snap!
This is a sponsored post written by me on behalf of ADM. All opinions are 100% mine.
When it’s summer, is there anything better than a refreshing drink full of flavor?? We don’t think so. In fact, we love exploring new cocktail recipes and making them with fresh ingredients filled with fascinating flavors.
Margaritas are a classic. This sweet, sour, and salty drink is one of the most popular in the world. It is easy to replicate, and there are hundreds of versions for every taste. This summer, we added cape gooseberries and serrano peppers for a special twist to this classic.
Some of you might be wondering what cape gooseberries are and what they taste like? Cape gooseberries, also called goldenberries, are a bright golden yellow fruit. They have a unique flavor: sweet, tart, tangy and tropical, and are loaded with nutrients. You’ll instantly notice both sweet and sour flavors when the berry bursts in your mouth.
You can enjoy cape gooseberries in a variety of ways:
• You can eat them like you eat grapes and cherry tomatoes, for snacks.
• Swap the cherry tomatoes with cape gooseberries and use them in sauces and salads.
• Add them to a cheeseboard
• They are also great in desserts and make for a tasty gooseberry curd cheesecake.
• They also work well in cocktails.
Serrano peppers are versatile chiles that are not too spicy and not too mild. Their perfect balance of heat makes them delicious in a wide range of dishes and drinks.
Cape gooseberries and serrano peppers are on ADM’s list as two of the top 5 ingredients that should be on everyone’s radar this Summer. ADM is a leader in the development of ingredients and flavors for foods and beverages. ADM believes that ingredients do not have to be used in certain ways. Instead, being creative with different flavor and ingredients combinations unlocks limitless opportunities to experiment with different trends. We could not agree more!! Experimenting with new ingredients and flavors is fun, and you will most likely create something unique and personal. We decided to incorporate both the cape gooseberries and serrano peppers in our favorite summer drink.
Where to buy cape gooseberries and serrano peppers?
The major grocery stores carry both cape gooseberries and serrano peppers. They are in the produce section and can be found year-round. The gooseberries can also be labeled as goldenberries.
Now that you know more about the two secret ingredients that we will add to our margarita let’s jump to the recipe.
To make the best margarita mix, you need to have on hand two main ingredients:
• Tequila: Silver or reposado is considered to be the best tequila for margaritas, but any type of tequila will work.
• Freshly squeezed lime juice: Fresh flavors are always the best, so we recommend juicing your own limes right before you make your cocktails.
These two ingredients are the base of any margarita. The following ingredients are the add-ons that will give your drink that special twist.
• Fruit: nearly every fruit pairs well with tequila. As we like to be creative with different flavors, we incorporated the cape gooseberries into this famous drink.
• Something sweet: If you would like to sweeten your margarita, we recommend adding agave syrup, simple syrup, or any other sweetener of your choice.
• Spice it up: The serrano pepper has a nice flavor and mild heat. Its heat pairs so well with the fresh lime juice and the cape gooseberry. Just make sure not to add too many seeds, as that is where the heat hides. You should also keep in mind that the longer the pepper sits in the drink, the spicier it will get.
• Club Soda: A splash of Club Soda will add a little fizz to the drink.
• Last, but not least…ICE!
That is all you need to have your spicy, tart, slightly sweet, and refreshing spicy cape gooseberry margarita!!! The full recipe is below.
Ingredients:
• 6 Cape Gooseberries
• 2 oz Tequila
• 1 tbsp Freshly Squeezed lime juice
• 1/2 Serrano Pepper
• Splash of Club Soda
• Agave – optional
Instructions
1. Add the gooseberries to a cocktail shaker along with the lime juice.
2. Muddle the gooseberries with a muddler, add tequila and shake vigorously.
3. Pour into a cocktail glass, fill with ice, add a splash of club soda and add the serrano pepper.
How adorable is this mini brie cheese!? We both love all sorts of cheese, but brie is probably one that is always on our cheeseboard. We prefer to add a topping to it, as they can be slightly plain in taste. Brie cheese is so versatile and pairs really well with either sweet, salty or both additions. The sky is the limit when creating anything with this soft and creamy cheese.
This salad takes minutes to prepare; it’s SO easy, delicious and with a beautiful presentation. Start by seasoning the arugula; in a bowl, whisk some good quality olive oil, champagne vinegar, salt and pepper. Toss the dressing with the arugula.
In a salad plate, layer some of the arugula on the bottom. Next, cut the mini brie cheese in the middle; we used Supreme Brie Bites, which you can easily find at your local grocery store. On the bottom half, spread a layer of your favorite fig jam and top it off with the other half. If desired, add a little more of the jam on top! Place the brie cheese on top of the arugula, add fresh cut figs, shaved almonds and top it all off with balsamic glaze.
Feel free to switch up some of the ingredients in this salad; instead of almonds, try pistachio or walnuts. Change the greens to suit your taste; mixed greens will go really well here. Omit the fresh figs if you don’t like it; it tastes so yummy without them too.
It doesn’t get easier than that!! It’s a great appetizer idea for your next lunch or dinner party. Your guests will love this!!
I have been loving serving our family dinners on a large serving board. Placing a food board in the center of the dinner table and letting everyone snack as they please is fun and reduces the number of serving dishes you have to clean. A few dinners I have served in a board are Pulled Pork Sandwich, Spring Rolls, Grilled chicken and cob salad, and of course… Tacos!
Tacos are not only easy to prepare, but it is also a crowd-pleaser. Most of the taco toppings (if not all) you can buy at grocery stores. But if you prefer preparing your own, it is even better, and there is really no secret.
I personally prefer preparing my pico de gallo, or also called “salsa fresca”. All you have to do is dice up tomatoes, onion, jalapeno and cilantro. Place them in a bowl and squeeze in the lime juice and add salt and pepper. Combine well all the ingredients and let them rest for at least 1 hour. You can even prepare one day in advance, and it will taste even better!
As for the protein, I usually go more traditional with ground beef, chicken or carnitas. But you can also add fish, shrimp, or just beans. I use the grocery store spice packets to season the beef, and then I throw it in a very hot skillet and let it cook until it is browned. I like it a bit saucier, so I add a tablespoon of beef stock. That’s it!
Sometimes I add soft tortillas, and sometimes the hard shells. You can pick one or add both to your board. There is no right or wrong! Just make sure to add the tortillas and/or taco shells as the last item to the board. I keep them in the oven and bring them to the table when I am ready to serve.
I have listed below some of my favorite Taco Toppings:
– Guacamole
– Pico de Gallo or salsa
– Lettuce
– Grilled peppers
– Black Beans
– Cheese
– Sour cream
– Hot sauce
– Jalapenos
– Fresh cilantro
And follow these easy tips to create your board:
– Choose a large food board.
– In small bowls, add your favorite toppings: cheese, guacamole, black beans….
– I like to serve hot items, like grilled peppers and tprotein in cast-iron dishes. They come from the stove directly to the board, and it will keep it warmer for a long time.
– Add the tortillas and/or taco shells as the last item.
– Add jalapeno and cilantro to finalize!
Once your board is assembled, you and your family are ready to dig in!
In a medium bowl, combine the diced tomatoes, onion, jalapeno and the chopped cilantro.All the lime juice and season to taste. Cover and refrigerate for at least 1-hour.
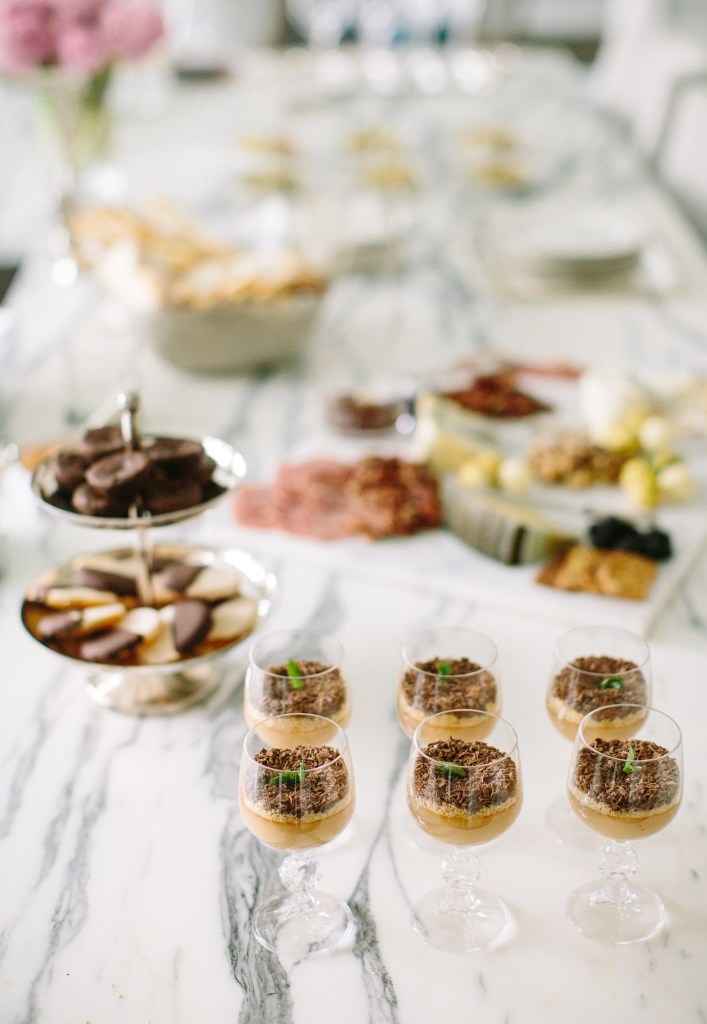
We love trifles, especially individuals ones. They are so easy to make, brighten up any dessert table and look so impressive. When I came across this recipe from ciaoflorentina.com, the picture looked so beautiful that I had to try it. It turned out to be SO delicious too! Barbara and I had to share this one since we love yummy recipes with a beautiful presentation. We call them winners! This no-bake tiramisu trifle is definitely one of them.
In a saucepan add the blackberries and blueberries together with the lemon juice, vanilla extract, honey and water. . Bring it to a simmer on low flame, cover with a lid and simmer together for a few minutes until the blueberries have popped. Allow to cool. Once cooled off strain the berry sauce separating the liquid from the solids.
Meanwhile using a mixer with the whisk attachment whip together the heavy cream with 1tbsp of the sugar. Transfer to the refrigerator and keep cold until ready to use.
In a different bowl cream together the egg yolks with 4tbsp of the sugar using the mixer with the whisk attachment. Start adding the mascarpone cheese a little bit at a time until incorporated.
Using a spatula add the chilled whipped cream to the bowl with the mascarpone and gently fold them together. Divide in two bowls.
Add the solid berries from the sauce to one of the bowls with the mascarpone and gently fold together. Set aside.
Dip the ladyfingers in the berry sauce and layer them in the bottom of the serving glasses or trifle dish. Add a layer of the berry mascarpone mixture followed by a layer of the plain mascarpone mixture. Repeat the layer until you run out of ingridients
Refrigerate for a couple of hours or until set.
Serve chilled garnished with some fresh blackberries, blueberries and fresh mint.
Who doesn’t love the classic blue and white color combination!? Try adding a vibrant green in the mix, and you got yourself a bold color scheme. When we designed this tablescape, we wanted a twist on the traditional blue and white, and by adding small green accents, we were able to achieve a beautiful and striking look.
The navy blue linen tablecloth worked beautifully here; how gorgeous are the white hydrangeas popping against the blue background? This white hydrangeas arrangement is so easy to put together, a great one for anyone, even those with zero floral skills. Watch the tutorial video at the end of the post.
Green apples as decorations pieces!? Yes!! Fruits look beautiful as decor items on a table, don’t be afraid to add them next time you set the table. They add so much texture and color. And who knows, you might have guests nibble on them – they act as food and decor! Win, win!
We love ginger jars and their versatility! They look beautiful in different settings and an exquisite addition to any tablescape. So get those jars out of the cabinets and place them on the table! The blue-rimmed dinner plates added another blue and white element to the table; however, if you don’t have them at home, plain white ones work beautifully as well.
The evergreen linen napkins, along with the green apples, added the perfect amount of green pop to the tablescape. Just what we wanted to give a little twist on the classic blue and white color combination.
This tablescape is a great inspiration for lunch or a casual dinner; we hope you enjoy it! Below are some links to items that we used here and other ones for pieces that will work well in this tablescape.
Hosting at home has never been so popular; it’s a safer and more controlled manner to gather with your family and intimate friends (the ones in your bubble). However, most people think that hosting at home can be exhausting and time-consuming. It doesn’t have to! Pizza, Salad, Dessert and let’s not forget the wine, everything served on the kitchen island. Easy Peasy and looks adorable. People just want to get together in person; that’s all it matters now. Keep it simple but cozy; all your guests will love whatever you plan.
The kitchen is the heart of most houses and most likely the best place to host a casual gathering. Lay everything on the kitchen island, and guests can help themselves. Very simple! If you want, add some flowers to enhance your kitchen’s decor. We always think that flowers can instantly transform any room or tablescape, but you can always live it out if a floral arrangement is not your thing.
Pear Naan Pizza with Honey and Goat Cheese! This pizza is SO easy to make, and it’s so delicious; we have made it so many times. The original recipe is by https://bygabriella.co
It doesn’t have to be difficult or expensive to create your own floral arrangement! A flower arrangement can instantly transform your home decor or your tablescape. However, most people feel overwhelmed to design a bouquet. We will help you create a simple yet beautiful hand-tied bouquet with a selection of flowers that you can find at your local grocery store.
One of the questions we get the most is where do we buy our flowers? Most of them are from grocery stores. The blooms available in grocery stores tend to last a long time, and usually, they are low maintenance, cheerful, and very affordable. We agree that flower shops carry a larger variety and much better quality flowers. But for those who don’t know much about flowers, this can be intimidating, so there is no problem starting with the grocery store ones until you decide to move with different colors and shapes.
When selecting the flowers, one tip is to avoid buying the blooms fully open. You should also always check the stems and leaves. You want to make sure that they are firm.
The first step when designing a flower arrangement is to decide on a color scheme. It is best to work with one or two main colors. And when it comes to floral design, the green act as a neutral tone that accents any decor.
There are several different ways that you can design and create your own flower arrangements. The hand-tied technique is simple and very quick to master.
Start by following the steps below:
1- Once you have chosen your color scheme, select flowers that have fine stems but are full of flowers, like roses, alstroemerias and hydrangeas.
2- Strip the foliage and thorns of the stems and lay them all on your table. You don’t leave any leaves on your stems for a bouquet because most of them will fall below the flower line. You should also always make sure you do this before you start arranging the flowers.
3- Begin by holding a single flower on your left hand (or your non-dominant hand), and then, using your other hand, add the second flower on an angle (crossing the stems). Keep adding the flowers at an angle, working your way around it.
4- Remember: One hand holds the arrangement, and the other hand adds the flowers.
5- Make sure to always turn the bouquet and slightly drop the stems’ height to get a rounded shape.
6- Make sure to look at the bouquet from the top and ensure that the flowers are nicely spaced.
7- Avoid having many flowers of the same type sitting together. Make sure that you mix them up to create a cohesive arrangement.
8- If you are not happy with the arrangement, don’t be afraid to put it down and start again.
9- Once you’re happy with the way it looks, tie the stems together firmly with a string or a rubber band.
10- Trim the stems gradually to fit the container.
For these two small arrangements, please find below the list of materials we used:
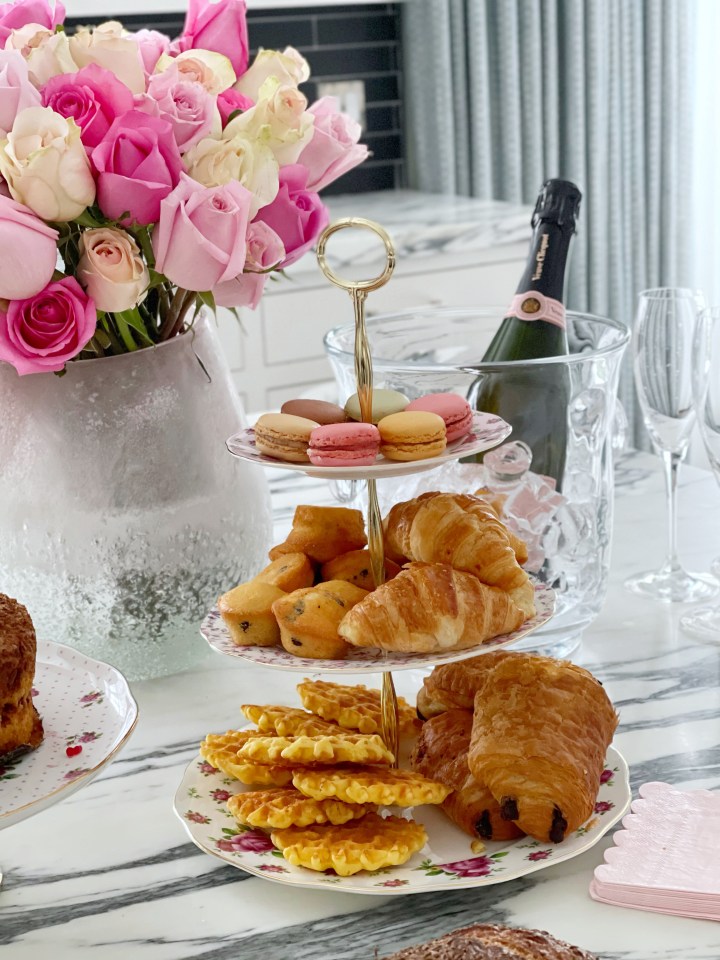
LOVE IS IN THE AIR!!! Valentine’s Day falls on Sunday this year, the perfect day to celebrate with an extra special Sunday Brunch. Whether with your immediate family, or some very close friends, this year, take the time to set up something a little special. This past year was a rough one for us all; we definitely need some love and to show some love, so cheer up your home with a Valentine-themed Brunch.
Brunch is probably one of the easiest meals to plan as you can serve several store-bought items. Add a variety of pastries, pound cake, bread, yogurt and fruits to your shopping list. The only dish you may want to prepare is the main one, like scrambled eggs, omelettes, french toast, croque monsieur or madame, or whatever you enjoy. Make the main dish easy or a little more elaborate, depending on your cooking skills. No brunch is complete without some champagne to toast, so add a little bubbly to your list. Mimosas or Bellinis are perfect for the occasion too.
You don’t need valentine designed dishes; you can simply add pink or red (or both) flowers to capture the season’s style. A ton sur ton pink roses arrangement like the one above is so easy to design. Pick three different shades of roses, remove all the leaves and cut all the stems around the same height. The pinkish vase definitely helped to elevate the theme, but it can look so beautiful in a clear vase as well.
A great way to serve yogurt is by placing them in a bowl full of ice to keep them nice and cold. This one is a decorative crystal bowl that I have on my coffee table, but didn’t it look so beautiful here!? On the side, add some optional toppings for the yogurt, I served berries, but the sky is the limit. You can serve nuts, chocolate chips, shredded coconut, granola, and so much more.
I bought this pink 3 tier stand for my daughter’s one-year tea party themed birthday. They are so cute, and I have used them a few times already. They are perfect for V-Day! However, any 3 tier stand works! This type of serving dish displays pastries beautifully, I tend to use a lot when serving brunch.
I am sending extra love on this year’s Valentine’s Day! I hope you have a day filled with pink, red, hearts, flowers, chocolates and all things valentine!
By Carolina
Shop items from this post here and some of our picks!
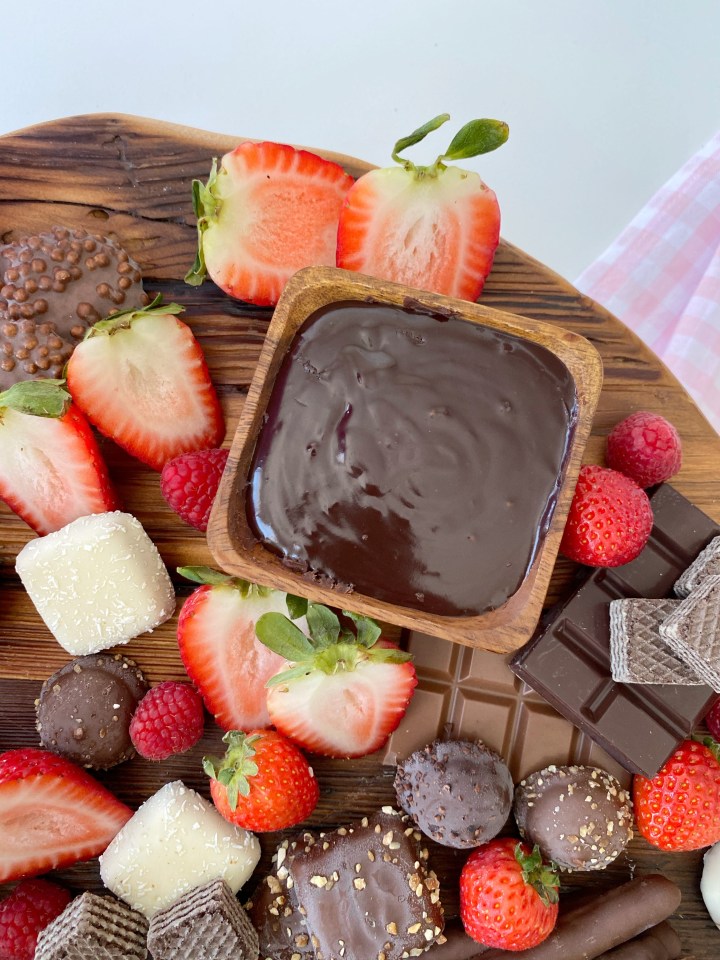
Chocolate boards became a hit amongst our family and friends. They are a beautiful display and so easy to put together. All you have to do is display your favorite chocolates and fruits on a board! The best part… NO BAKE IS REQUIRED!
The first thing is to choose your board. This is the type of dessert that can be scaled to serve any number of people. You can arrange a chocolate board for two or 50! The number of people you will be serving will dictate how big or small your plate should be. We chose a round wood board, but it also looks beautiful on a marble tray or even a ceramic plate.
The next step is to choose what you want to add to your board. This is where you get creative! There are no rules, and you can combine your family favorites.
On this board, we added:
– Chocolate ganache;
– White chocolate;
– Belgium chocolate biscuit assortment
– Dark chocolate bar
– Milk chocolate bar
– Chocolate covered finger cookies
– Bite-size wafer cookies
– Strawberries and raspberries
The only thing homemade is the chocolate ganache! Not even sure if we can consider this as homemade, lol! It’s is a 2-ingredient recipe: semi-sweet chocolate and heavy cream, at a 1:1 ratio of cream to chocolate.
How to make chocolate ganache:
1- In a microwave safe bowl, add the finely chopped chocolate (or chocolate chips) and heat in the microwave for about 1 minute.
2- Pour the heavy cream into a microwave safe bowl and heat in the microwave for 45 seconds.
3- Combine the warm cream and chocolate and whisk together until well combined and smooth. If needed, return to the microwave for another 30 seconds.
After you stir the chocolate and warm cream together, use the ganache right away.
Don’t try to do the same with the white chocolate. It doesn’t work! Using a heatproof bowl, microwave the white chocolate, stirring every 15 seconds, until it is melted and smooth.
Now it’s time to assemble your board. There are no rules, but here are some tips:
– Start by placing the bowls on the board;
– Place the cookies and chocolates creating different heights and mixing the colors (for example, the dark chocolate on top of the milk chocolate, or vice-versa);
– Fruits not only go so well with chocolate, but they also add a beautiful pop of color to the board.
Chocolate covered strawberries are extremely easy to make but are so elegant, beautiful, impressive looking and romantic. We love them! I mean, who doesn’t love them!? They are beautiful on their own, add elegance to a dessert table, or the final touch on top of a cake or cheesecake.
Ingredients
Strawberries
White, Dark or Semi-Sweet Chocolate Melting Wafers or Baking Chocolate Chips
Wash and dry the strawberries. Make sure to dry them well; they must be completely dry. The water will prevent the chocolate from sticking to the strawberry.
Line a sheet pan with parchment or waxed paper.
Using a heatproof bowl, microwave the chocolate wafers and a little bit of the coconut oil, stirring every 15 seconds, until they are melted and smooth. Coconut oil is not essential, but it helps hardens the chocolate faster and makes it a little thicker.
Holding the strawberry by the stem, dip it into the chocolate, turning it to coat. Lift and let excess chocolate fall off.
Lay the strawberries on the parchment paper.
Wait 30 minutes for the chocolate to set, or place the strawberries into the refrigerator for 15 minutes to speed the process.
Enjoy them the same day, that’s when they are best. However, you can keep them in the refrigerator for 1 or 2 days.
Marbled Decoration
For a marbled effect, melt the dark and white chocolate as described above. Using a small spoon, drizzle some of the dark chocolate onto the white one. Do not stir! Dip the strawberries into the chocolate mixture, twist and turn when lifting up to create the marbled effect. Watch the video below for the full tutorial.
Is there anything better than staying home on a cold night enjoying cheese fondue and a glass of wine!? Sounds like heaven to us! So why not add one to your cheese platter!? We don’t know about you, but for us, we can’t get enough of cheese.
Serving cheese fondue feels super special, like being in the Swiss Alps (lol), really simple to prepare and so cozy for a winter night. Although growing up in Brazil, we always enjoyed going to a fondue restaurant. I guess you can have it in any weather (lol)!!!
There are many ways to make cheese fondue; however, use a Fondue mix for a quicker and easier way. Just make sure to make it on the stove and then transfer it to the fondue pot. Serve with crusty bread, crunch vegetables like broccoli or cauliflowers, fruits like apples and pears, cherry tomatoes and potatoes. Make sure you have enough skewers for everyone, the last thing you want is people sharing them.
This Holiday Season, we are staying in and celebrating with our immediate family. This year it’s all about staying home, connecting with them, and trying new recipes. We will be cooking a lot!!! So, when Mezzetta sent us their castelvetrano and kalamata olives, their marinated artichoke hearts, and their sun- ripened dried tomatoes we wanted to create something yummy for our families to enjoy. After all, Mezzetta Makes it Betta!
This is a sponsored post by Mezzetta. All opinions are our own.
Growing up, our dad always served olives, whether we had guests or not. He loves them so much; he could eat off a jar. Maybe that’s why we both love olives since we always had them in our pantry. They can strengthen the flavor of any dish but are also amazing on their own. Green or black, we love them all!
Homemade Olive Spread is so delicious and comes together in minutes. We also love how versatile it is and how it adds a fantastic salty and savory flavor. You can serve it by itself, add to your charcuterie board, or on top of pizza, sandwich; so many possibilities!
As you probably already noticed, we are all about simple recipes that are full of amazing flavors! This recipe combines the buttery sweet flavor of Mezzetta’s castelvetrano olives with the rich and unique taste of Mezzetta’s kalamata ones. Mezzetta olives are so rich and delicious that it was not hard to create this appetizer that we can now rely on each time.
This recipe has no secret! It is just a combination of high quality ingredients that will make this spread a success.
Place all the ingredients in the bowl of a food processor. Since it’s a small amount, an olive spread can go a long way; we recommend using a small food processor or an immersion blender. Pulse a few times, but don’t overdo it; you want the olive pieces to be small but not pureed, a little chunky in texture. Serve with bread and crackers.
Don’t be afraid to play with the ingredients; if you don’t like parsley, add your favorite herb. Or better than that, mix a few of your favorite ones. Also, you can try different varieties of Mezzetta olives; they have so many options that will please anyone.
Did you know that orzo is pasta!? It’s shaped like rice, but it’s actually pasta. This salad is such a hearty and filling one that you probably don’t need much else for dinner.
When planning our holiday meal, we all tend to spend all the attention on the main dishes, the appetizers, and the desserts., and the side dishes tends to get overlooked. But with just a few steps, you can create an amazing salad that is as much as comfort food as the other traditional dishes.
This hearty winter salad combines 6 ingredients that are profoundly delicious and comes together as a very festive side dish. We tossed the orzo with arugula to add lots of green, Mezzetta sun-ripened dried tomato for a sweet-tart flavor, pine nuts for a toasty crunch, parmesan cheese for a gritty texture, and finally, the artichoke on top. The Mezzetta marinated artichoke hearts add an essential briny flavor; it’s the perfect final touch.
Start by preparing the orzo: boil water, add the orzo, and cook for about 7-9 minutes or until “al dente.” Be careful not to overcook it! Drain the orzo and gently run cold water over to cool off. We like to wait a few minutes for the orzo to dry a little and then add the other ingredients. Add the arugula, sundried tomatoes, pine nuts, shaved parmesan, and top it all off with Mezzetta Marinated Artichoke Hearts.
For the dressing, combine all the ingredients in a food processor and blend until smooth. Taste and adjust salt and pepper as needed. This salad also tastes great with only olive oil, salt, and pepper. It’s a great alternative for a simple and quick dressing.
You can try different variations to this salad by switching the greens; spinach works well. You can swap the nuts; shaved almonds would work beautifully here. If parmesan cheese is not your favorite, try feta or your favorite kind of cheese. The sky is the limit; you can swap ingredients to the ones you like best.
We hope you can enjoy these two recipes as much as we did! There is nothing better than cooking at home, staying in, and connecting with your family. Savor these moments!
With a chocolate cake base and creamy mousse topping, this make-ahead chocolate raspberry mousse cake is as easy as a pie and a great dessert for the Holiday season. There is no secret! It is just a soft and moist chocolate cake, topped with a creamy chocolate mousse and covered with fresh raspberries! Does this sound amazing or what!?
For this recipe, we used a boxed chocolate cake mix. It’s hard to beat the convenience of a box mix cake, and we are always looking for ways to simplify a recipe but keeping a delicious taste. The cake combined with the chocolate mousse will taste as you made it from scratch.
We made and baked the cake as directed on the box. You can bake it in a 9’ pan or in a 13 x ’9’ pan. The cake should not be too tall, aiming for a thin cake layer (about 2’ tall). We baked ours in a 9’ pan and ended up removing the top to make it thinner.
While the cake is baking, you can start preparing the chocolate mousse. You will notice that this recipe calls for gelatin. The gelatin is a stabilizer and also helps maintain the light and airy texture in the mousse.
When adding the whipped cream, carefully fold into the chocolate and stop immediately when the chocolate mousse is incorporated.
It is also very important that the mousse has a firm consistency; otherwise, it will run all over the raspberries. We recommend chilling it in the fridge for at least 1 hour before adding it to the dessert.
When the chocolate cake is ready, and the mousse is firm, you can start assembling the dessert. Watch the video for the tutorial.
1box Betty Crocker™ Super Moist™ devil's food cake mix cream(water, vegetable oil and eggs for the cake mix)
7 ozsemisweet chocolate chips
½cupmilk
½cupsugar
1 sachet unflavored gelatine (about 2 tsp)
1½cupwhipped cream
Raspberries
Instructions
Cake Base
Heat oven to 350°F (325°F for dark or nonstick pans).
Make and bake cake as directed on box for 9-inch round cake pan or 13 inches x 9 inches cake pan. Cool in pan for 10 minutes. Remove from pan to cooling rack. Cool completely, about 30 minutes.
Place a round cookie cutter (or even use the same bowl you will serve) on your baked cake. Slowly apply straight downward pressure on the cutter until it has cut through the height of the cake.
Chocolate Mousse
Prepare the gelatin as directed on the box. Reserve.
In a pot over low heat, whisk together the milk, sugar, and gelatin until the gelatin melts. Do not boil at any time, or the gelatin will lose its properties. Remove from heat.
Melt the chocolate in the microwave, add the milk and gelatin mixture, and mix until well incorporated. Reserve and let the chocolate mixture cool a little bit.
With a handheld or stand mixer fitted with a whisk attachment, whisk the heavy cream on medium-high speed until stiff peaks form.
Whisk ¼ of the whipped cream into the cooled chocolate. Then gently fold in the remaining whipped cream.
Put the chocolate mousse in the fridge for about 1 hour or in the freezer for 20 minutes.
Assembly
To facilitate assembly, place the mousse in a large pastry bag and make a medium cut.
Arrange the cake in the serving bowl and distribute the raspberries filling the entire base.
Cover the raspberries with the chocolate mousse.
Add raspberries on top of the mousse
Refrigerate the dessert for at least 4 hours before serving, but we recommend leaving it in the fridge overnight to ensure the perfect texture.
If you’ve been following us for a while, you know that we love flowers and flower arranging. Fresh flowers add color and bring life to any Home Decor!!!
If you feel intimidated by creating a flower arrangement at home, this three-vase arrangement might be a great start! This arrangement is a no-fail, and you will love it. It has a balance of simplicity and visual impact. The three different heights play a role in creating an impactful floral arrangement with minimum effort.
All you need is three glasses vases of different heights (these range from 15 inches to 9 inches), two varieties of flowers in the same color, and some foliage! We love the traditional red and green for the Holiday season, so we stick to this color combo here. We chose to work with red alstroemerias (18 stems) and red roses (12 stems). This arrangement would also look beautiful with amaryllis or red lilies.
The first step is to fill the vases with room temperature water; unless the flower buds are tight and you want to help them open up faster, you add warm water. Don’t forget to add flower food to your vase water (they usually come with the flowers when you purchase them at grocery stores)! It will help slow down bacterial growth.
This is a loose arrangement, so all you gotta do is to keep your flower stems long and just give them a little trim as needed. When trimming the stems, make sure to do it at an angle. Doing this ensures that the flowers will be able to absorb plenty of water and nutrients.
We prefer starting with the highest vase as this will dictate how high the other arrangements should be. Add the first set of flowers to the vase and tip them over. Make sure that there are no leaves below the waterline. Follow the same step with the foliage and the roses. That’s it!!! It is just three vases with flowers leaning on them! It can’t get any easier than that.
Pumpkins are a staple of fall and the perfect addition to the season’s table decor. Paired with one of our favorite flowers: hydrangeas and autumn-themed plates, it created a seasonal flair.
In this tablescape, we went with the small white pumpkins for a more elegant and clean look. We added dried green hydrangeas that we kept from the summer!
The two tall vases on each end of the table gave an exquisite look to the table decor. The hydrangea burgundy and dark green shade of colors complemented the fall feel. Check out our you tube channel for a tutorial on this arrangement.
For the dinnerware, first, we selected a natural willow placemat (we also love this one) followed by a whitewash colored charger plate, dinner plate, and an autumn-themed salad plate. These pieces’ colors all followed a fall hue; carefully consider the dinnerware’s design and color scheme to match the table decor’s theme. We kept drinkware simple and sweet! As for the flatware, we went with a bright stain place setting embellished by detailed braiding, so unique.
The classic white tablecloth got an uplift by placing table runners vertically, not your typical table linen selection. Don’t be afraid to experiment with what you have!
Sweet Summertime can become even sweeter with this Blackberry and Vanilla cake. These two flavors come together to create a showstopper dessert, that will have your guests reaching for seconds. It’s so easy to make and looks stunning. Definitely a must-try!!
Summer days call for refreshing cocktails that capture the essence of the season. And this Watermelon Tequila cocktail recipe is the perfect way to beat the heat and indulge in a delicious blend of flavors.
Ingredients:
10 cups diced seedless watermelon
1/4 cup fresh lime juice
1 3/4 cups blueberries
3/4 cup lightly packed fresh mint leaves
1 1/4 cups silver tequila
Ice
Mint sprigs for garnish
Instructions:
Prepare the Watermelon Juice:
In a blender, puree the watermelon until smooth.
Set a fine-mesh strainer over a bowl and strain the watermelon juice, discarding the pulp.
Combine the Flavors:
In a large pitcher, combine the lime juice, blueberries, and mint leaves.
Gently muddle the blueberries and mint to release their flavors.
Add the watermelon juice and tequila to the pitcher.
Refrigerate the mixture for about 2 hours to allow the flavors to meld and the cocktail to chill.
Serve and Enjoy:
Fill tall glasses with ice.
Pour the chilled cocktail into the glasses.
Garnish each glass with a sprig of mint.
Sip and savor the refreshing flavors of summer!
Tips and Substitutions:
Feel free to substitute blueberries with another berry of your choice, such as raspberries or blackberries.
If you prefer a sweeter cocktail, you can add a touch of simple syrup or agave nectar to taste.
For a fun twist, try freezing some watermelon cubes and using them as ice cubes in your cocktail.
Make sure to use ripe, juicy watermelon for the best flavor.
If you don’t have a muddler, you can use the back of a spoon to gently crush the blueberries and mint.
This Watermelon Tequila cocktail is a delightful combination of sweet, tart, and refreshing flavors. The watermelon provides a natural sweetness, while the lime juice adds a touch of acidity. The blueberries and mint contribute a subtle fruity and herbal note, and the tequila brings it all together with a smooth, boozy kick.
Whether you’re hosting a backyard barbecue, relaxing by the pool, or simply enjoying a warm summer evening, this cocktail is the perfect way to celebrate the season. So gather your ingredients, mix up a pitcher, and raise a glass to good times and great flavors!